Welcome to my blog. This is where I will update you about my little game which I am creating during this course called animation and interactivity 1.
Latest
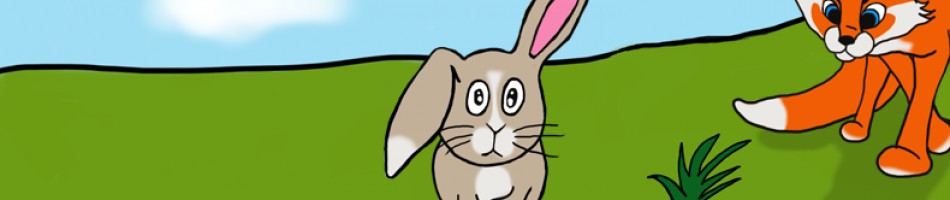
The Animation Of The Enemy
This post is related to case 06 where we had to animate the enemy and add it in to the game, make it follow the character and make a visual reaction when the enemy and the character are in contact.
At the beginning I just added the bunny as an enemy because I did not have any other character animated for the enemy. I also thought that I did not have enough time to finish a good quality animation of the fox. I told my supervisor that I might had to change my plans and animate something easier to be finished in time for deadline. He told me that it would be a very drastic change to my plans and that I should rather stick to it and make the quality of the animation less perfect that it would be in the first place.
I listened to him and have now animated a fox.
This is how the animation looks like:
I have animated the fox in a way where he is lurking after the bunny the same way as kittens do when they are hunting. I talked to Knut who is one of the animation supervisor, who said it was a good idea in terms that I did not need to animate to much. This way the fox does not have any big movements which made it easier for me and less time consuming.
The animation is still lagging a little bit. It still needs more in-betweens to make the animation look smooth. At the moment I do not have enough time to completely finishing it. I have to concentrate on writing the report, blog and commenting my script to show that I understand my codes. When I am finished with that I might go back to the animation and finish it.
Update:
I have now been working more with the animation. I first started making more in betweens but that did not look good. I stead made every picture in to two frames. That made it look a lot better.
Adding jump
I added a jump to the character.
I asked Jørgen how he made his jump work. He used an example from a forum. You can find it here.
I downloaded the example, looked through the scrip and read the comments and explanations in the script to understand what was done. I tried to do the same thing as shown in the example, but it was hard for me to understand everything. I still tried to copy what had been done in the example to see if it worked. In the beginning I got a lot of errors and got help from Olaug to fix them.
In the beginning the bunny just jumped and never came back to the ground again, so Olaug putted in a code in to my script that pushed it down again when it jumped, to make it land.
She also helped me tide my codes and made them in to different functions.
This is how the jump code looks like:
1 private function jump(){
2 if (pressedUp ==true && !inAir){
3 vel = jumpVel;
4 inAir = true;
Explanation:
1 The function which controls the character’s jump
2 If the arrow key up is pressed down and the character is not already in the air
3 the vertical speed changes from value of the gravity force down to the value of the jump force up
4 and the variable inAir is set to true
To make the function work I added it under the onFrameLoop, by writing jump().
I also had to change a little bit of my gravity function to make the jump function work.
This is how it looked like when I fixed little bit by my self:
{
karakter.y = karakter.y;
while (bakke.hitTestPoint(karakter.x, karakter.y, true)){
karakter.y = karakter.y -1;
inAir = false;
}
The jump did not quite work the way it was supposed to do, so Olaug helped fix it a little bit and made it look like this instead:
{
vel+=1;
karakter.y = karakter.y +vel;
while (bakke.hitTestPoint(karakter.x, karakter.y, true)){
karakter.y = karakter.y -1;
inAir = false;
}
After the help from Olaug, the animation lands when it is in the air, so I have to make the jump animation in to two parts to make the animation land when it is actually reaching the ground.
When the codes for the jump was fixed I later realized there was another problem with my game.The bunny just disappeared after a while. With some help from Robin we figured out that the code which pushes the bunny down again when it jumps in the air, also pushes him through the ground after a little while. Robin explained to me why it was happening and helped me fix the code, and the problem was solved.
This is how the code looks like after I got help from Robin:
1 {
2 if(inAir)
3 {vel+=1;}
4 karakter.y = karakter.y +vel;
5 while (bakke.hitTestPoint(karakter.x, karakter.y, true)){
6 karakter.y = karakter.y -1;
7 inAir = false;
8 }
1
2 If the character is in the air
3 when the character jumps gets pushed 20 pixles upwards per every frame update. Here it is added positive acceleration so that the velocity will slow down and then increases
4 which makes the character move up and the slow down, and then fall down faster and faster
5 as long as the grounds pixels are in contact with the characters anchor point
6 the character will stop moving vertically down (falling)
7 and the variable inAir is set to false
8
Case 06
In this case we had to add an enemy which is following the character, and add a reaction when the enemy and the character are in contact.
This Friday I actually think that the lecture and the case had something in common, and that the lecture actually helped a lot for me to understand how to solve some parts of the case. He had a lecture about adding an npc, using a separate class and and making it turn when it’s position is on the edges of the screen.
The enemy had to be made in a separate class. I did the same thing as our lecturer did to add my enemy in to the scene and make it turn when it’s position is on the edge of the scene.
To make the enemy attack you:
My code is a little bit more advanced than just making the enemy follow the character. My code is measuring the distance of the enemy’s and character’s position, and if the distance between the enemy and the character is between 300 and 100 pixles it will follow the character. If the character’s position is less than 100 pixles, the enemy will not “attack”. This way the character will be able to land and not die when it jumps over the enemy.
After some help from one of the guys from my group I also moved the Hittest that removes the character when the enemy comes in contact with it, and following and turn function in to a separate class.
That is the reason why the “npc” name in the first code above has been changed to “this” to make the functions work. So instead of writing (karakter.x-npc.x) I write (karakter.x-this.x). I use “this” because it is inside a class that extends the Npc’s movieclip, and “this” therefore refers to npc.
In the beginning I just used the npc class example that our tutor had used in the lectures. It had a lot of mathematical formulas which where not neccecary for the type of movements I needed for the npc. I therefore asked for help from Daniel to clean it up and make it more simplistic and easier for me to understand, while still keeping the necessary functions.
This is what the code that makes the enemy follow the character looked like in the beginning:
1 private function fiendeattack(){
2 if (npc.hitTestObject(karakter)){
3 if (karakter.parent != null){
4 karakter.parent.removeChild (karakter);
5 trace(“Game Over”);
6 }
7 }
8 if (npc.x R){
9 npc.snu();
10 }
11 else if ((npc.vx < 0) && ((karakter.x-npc.x) 100)){
12 npc.snu()
13 trace(“attackRIRGHT”)
14 }
15 else if ((npc.vx > 0) && ((karakter.x-npc.x) -100)){
16 npc.snu()
17 trace(“attackLEFT”)
18 }
19 }
1 A function which controls when and how the npc will attack the character
2 If the npc collides with the character
3 and if the character exists
4 the character will be removed from the scene
5 and “Game over” will be traced in OUTPUT
8 if the horizontal position of npc equals to R (the right edge of the screen)
9 the turn function will be run
11 else if the npc is moving left and the distance between the character and the npc is 100 (meaning the npc is on the left side of the character)
12 the turn function will be run
13 and “attackRIGHT” will be traced in OUTPUT
15 else if the npc is moving rigth and the distance between the character and the npc is – 100 (meaning the npc is on the right side of the character)
16 the turn function will be run
17 and “attackLEFT” will be traced in OUTPUT
This code did not work properly. The enemy started to flip over and over again when it “killed” the character. When the character died I just made it disappear.
To make the enemy follow code work and make it not flip over and over again when it are in contact with the character, I changed the code to this:
1 if ((this.x < 25) || (this.x > SKJERMBREDDE-25)){
2 lokalHastighet = -lokalHastighet;
3 this.scaleX = -this.scaleX;
4 }
5 else if ((lokalHastighet > 0) && ((karakter.x-this.x) < 400) && ((karakter.x-this.x) > 300)){
6 lokalHastighet = -lokalHastighet;
7 this.scaleX = -this.scaleX;
8 }
9 else if ((lokalHastighet < 0) && ((karakter.x-this.x) > -400) && ((karakter.x-this.x) < -300)){
10 lokalHastighet = -lokalHastighet;
11 this.scaleX = -this.scaleX;
Explanation:
1 if the npc is less than 25 pixels from the left edge of the screen or the npc is less than 25 pixels from the right edge of the screen
2 makes the npc move in the opposite direction
3 flips the npc so that it points to the correct direction
5 else if the npc is moving right and the distance between the character and the npc is less than 400 pixels and more than 300 pixels (the npc is on the right side of the character)
6 makes the npc move in the opposite direction
7 flips the npc so that it points to the correct direction
9 else if the npc is moving left and the distance between the character and the npc is more than -400 and less than -300 (the npc is on the left side of the character)
10 makes the npc move in the opposite direction
11 flips the npc so that it points to the correct direction
Case 05
In this case we were to make a Sprite, and use a simple collision detection to make the character follow an uneven ground and make it “pick up” an element when it is touching it.
This is how I made a sprite:
You create a movieclip, and create a blank keyframe, drag an animation which is in another movieclip into the scene, and click at properties for that frame and give it a name under “label”. You do the same thing to add another animation to the sprite, just by adding it to a new blank keyframe.
My sprite has only two animations at the moment, the first frame is the walk animation and the second is the idle animation. The frames are labelled “Walk_Animation” and “Idle_Animation”. To make my character walk when it is supposed to walk I added the label name in the () for the code, like for instance karakter.gotoAndStop(“Walk_Animation”). In the beginning I did not have a label name for each frame and just wrote the number of the frame in the (), which made it messy and hard to see which animation is being referred to.
To make the character follow the uneven ground I simply made the character continuously move downward and I used a Hit test code to determine when the character was on the ground and to stop the character from being pushed through the ground. I honestly did not understand how it was supposed to work at the beginning. Last Wednesday I have to admit I was a bit angry, because the lecturer we had before the group meeting did not do any lecturing about what we were about to have in our case, and I did not understand much after the lecture. After the break our supervisor gave us a new case and said “solve this case, you have been lectured about it earlier this day, you know how to solve it”, which was false.
Then the supervisor gave us a code and said “use this code and your character will follow the uneven ground”, but I had to find out myself where to use the code and what else to write in the script to make it work. I have to say that so early in the learning phase it was very hard for me to figure out how to code and what to write to make it work. Luckily I got some help. Still I did not understand why the code worked the way it did before Daniel sat down with me and explained every single code in my script.
This is what the hit test code looks like when it works:
1 public function onFrameLoop (e:Event) : void
2 {
3 karakter.y =karakter.y +10;
4 while (bakken.hitTestpoint (karakter.x, karakter.y, true))
5 karakter.y =karakter.y -1;
6 }
What this code means:
1 Everything that lays in the function onFrameLoop will be repeated in every single frame (24 fps which is specified in the main .fla file)
3 makes the character move 10 pixels vertically down on each frame update (onFrameLoop),
4 but as long as the ground and the character’s point of origin are in contact (hitTestpoint)
5 the character will stop falling.
I did not really understand why I needed the karakter.y =karakter.y -1; in the code, but Daniel later explained that it moves the character 1 pixel off the ground each time it hits the ground, and thereby stops the character from falling through it.
How I made my bunny collect carrots:
After some lecturing from Daniel I actually managed to make a code from my head.
To figure out how to make my bunny pick up a carrot I thought to myself;
if the character hits carrot then removeChild carrot and add +1 to the variable carrotsCollected
I wrote my codes in Norwegian so my codes have Norwegian names instead of the English above. To make you understand my code a little bit better I have to translate some words for you: character=karakter, carrot=gulrot, carrotsCollected=gulrotterPlukket.
The code I made in the beginning looked like this:
if (gulrot.hitTestPoint(karakter.x, karakter.y, false))
{
removeChild (gulrot);
gulrotPlukket = gulrotPlukket +1;
trace(gulrotPlukket);
}
It kind of worked, the carrot did disappear from the visible scene, but it kind of did not at the same time because the bunny still kept on collecting something which was not there. With some help from Daniel the code was changed to this code:
if (karakter.hitTestPoint(gulrot.x, gulrot.y, false))
{
if (gulrot.parent != null)
{
gulrot.parent.removeChild (gulrot);
gulrotPlukket = gulrotPlukket +1;
trace(gulrotPlukket);
}
}
And this code works!! 😀
By adding the “if” statement the code first checks if there are any gulrot left in the scene (!= null), if there are any gulrot left, then and only then it will remove the child, register that a gulrot has been collected and trace the current number of gulrot collected.
Although this works by itself, I want my character to collect more than one carrot, and this code only works for collecting one, so I made a new class in a seperate file as the lecturer showed us in one of our lectures on Friday, and I did actually manage to add several carrots to the scene at the same time that way, but my code for collecting the carrots did not work any more. I got help from Gisle, Daniel and Olaug at the same time to fix it. They helped me add an array and made a hitTest code that worked for the array. The case says that we have to make a new class in a separate file, I did that in the beginning, but when Gisle and Daniel helped me they made the class in the original script file instead. I have later learned how to easily put this over into a separate class and inheriting all the stage properties from the main .as file to optimize the code. In the example below I have however not yet implemented this.
Now the code looks like this:
1 public function onFrameLoop (e:Event) : void
2 gulrotterHitTest();
3 }
4 public function gulrotterHitTest(){
5 for (var i:int=0;i<gulrotter.length;i++) {
6 if (gulrotter[i]!=null && karakter.hitTestObject(gulrotter[i])) {
7 removeChild (gulrotter[i]);
8 gulrotPlukket = gulrotPlukket +1;
9 trace(“Ny gulrot plukket, antall Gulrøtter plukketet er nå”, gulrotPlukket);
10 gulrotter[i]=null;
11 }
12 }
13 }
Instead of hitTesting one carrot it now hitTests an array of carrots.
2 The new function “gulrotterHitTest” is being run on each frame update
5 This is a for loop which creates a new variable “i”, checks if the number of gulrotter defined earlier (gulrotter.lenght) has a higher value than “i”, and increments “i” (i=i+1).
6 Checks if a specific instance of gulrotter is still in the scene and if the character’s pixels hits any of the pixels (hitTestObject) on the specific gulrot (gulrotter[i])
7 If so, it will remove the specific child of gulrotter which has been hit,
8 it will add 1 to the number of gulrotPlukket
9 trace a comment with the current number of gulrotPlukket
10 and set that specific gulrotter instance to “null”
This way it will be able to hitTest a whole array of gulroter, determine which gulrot is being hit and remove it, and determine when to stop checking for each instance of gulrotter.
Although the learning curve of case 5 was a bit more steep than in case 4, I have learned a lot, and I now more or less understand all of my code.
Case 04
In this case we had to add the character in the scene and make it walk to the left and right, and script it so that it will not walk out of the scene.
I did not have a lot of problems solving this case, though I had some difficulties understanding how to do practical things in flash like converting library elements into MovieClips and exporting them to actionscript. I also had a few problems with some of my codes, but I got help from Olaug to fix it.
All in all Case 04 was easy to understand and execute.
Case 03
In this case I had to make three different backgrounds/scenes, and have some animation in them.
As you can see in my previous blog posts I already have made som sketches of how I am thinking the background could look like.
I made drawings in Photoshop that I want to use in my game, but the style of the background and the style of the animation of my bunny is totally different. I am thinking that I can make it look like the bunny fits in to the scene using filters another time. This is how the first background looks like. The foreground, middle ground and background is made in different layers so that I can animate the scene.
This is how the first scene looks like.

This is how the animation looks like after I have animated it in Flash. I animated the foreground, middle-ground and the background, and added the rest animation of my bunny. I am thinking that this scene could be the intro.
This is how it looks like.
I had some problems with the layers when I imported the layers from Photoshop to flash and animated them. Parts of the layers where broken and did not follow the animation the way I wanted it to. None of the supervisors knew how to fix it and I was not the only one in my group that had that problem. I managed to hide the problems when I animated it, but it still was a bit enjoying as it was of waste of time. In this scene I used the walk and the rest animation of the bunny.
This is how the second background looks like.

I did not have any problems with animating the layers in this scene. My challenge in this scene was to flip the animation of the bunny horizontally because I wanted the bunny to walk the opposite way. After some help from a one of my peers, Daniel, I managed to do it. I am thinking that this is the scene where the bunny starts harvesting the carrots. In this scene I used the walk animation of the bunny.
This is how the animation looks like.
This is how the third background looks like.

I am thinking that the bunny has to avoid the fox in this scene. As you can see this is a bit scary scene where allot of other bunnies have died. I made the scene look darker in flash to make it look scarier. In this scene I used the walk and jump animation of the bunny.
This is how the third animation looks like.
Case 02
In case 02 I had to animate my main character in a rest position, walk to the left and the right, and jump.
I started with the jump animation. At the beginning I sketched every frame of the animation. I had some problems maintaining the same size and shape of the character throughout the animation, and the animation lagging a little bit. The bunny might be jumping to far with the amount of frames the animation has. I can not add more frames as it will ruin the timing of the animation, so I might have to move every frame a little bit to make it look smoother.
I used some of the animation principles; Mainly squash and stretch (body and the ears), follow through and overlapping (ears), anticipation (before it jumps you can see it prepares for the jump by squeezing itself together) and timing.
Jumping
This is how the first animation looks like.

I got one of the supervisors to look at my animation, to see if there was anything I could do to improve it:
- When the bunny lands the ears have to go a little bit forward.
- The head could go further down when the bunny lands.
- Hold one frame when the bunny is on the top of the jump, so that it does not look so weird.
- The front paws can bend a little when the bunny lands.
- And the bunny has to blink when it lands.
At the moment I am concentrating on finishing the other animations before I start improving this animation.
Resting
I have made an animation of the bunny resting now… When the bunny is resting it stands up to make sure the fox is not closing in to kill him.
This is how the animation looks like at the moment. It is not finished yet. I think the timing is not good enough. The bunny kind of stands up a bit to slow.

I fixed the timing and added some frames where the bunny stands up and made it sit down again. Now it looks like this.

To upload the animation to my blog I have to export the clip as animated gif. and I have noticed that the animation is slower on these animations than the animations in SWF movie clips. Which is a shame, because you can not see what I am talking about when I talk about timing. 😦
I added some blinking to the animation. Please tell me what you think of it.

Walking
This is how the walk cycle looks like. I am not happy with it as the shape of the face and the eyes are changing every frame, and the follow trhough of the ears is not very good. I will fix that later when I have some more time.
I will also loop the frames so that you can see the bunny walk forward. I not happy with the animation at the moment. When the bunny walks it kind of kicks just the way it does when it jumps. Some people have commented that it looks weird. The reason I chose to do that is because one of the supervisors suggested me to do it.

I have added a animation where the bunny walks forward.

Case 01
In this case I had to think about my project idea, design and draw a main character for my idea. The main character has been drawn in Adobe Flash and designed so that it can be easily animated in Case 02.
The project Idea.
The Idea is simple; It is going to be a little game about a little bunny (the main character) which loves carrots. The game takes place on a field where there are plenty of carrots that the bunny wants to harvest. The only problem is that there lives a fox on that field which loves to eat bunnies. Therefore the bunny has to harvest the carrots without getting killed by the fox.
At the beginning my idea was only about the bunny harvesting the carrots, but it did not have any real obstacles in it, which made the game boring. I therefore looked at the games from the second year’s students and saw that some of them had made a character that followed the main character, which killed the main character when they came in contact. Based on this observation, I added the fox as a second character in my project idea.
I started sketching my idea in Photoshop and ended up with this drawing:

I am quite happy whit it and are thinking about using this image as the menu for my game. I showed the drawing to one of our supervisors, Olaug, and she told me that it was a very good drawing. She said that if I am going to make animations on the menu I had to make it in flash, so I ended up redrawing everything in flash. Now it looks like this, and is ready to be animated:

Maybe I should have made some shadows, as it kind of looks a little bit flat at the moment. I was thinking that I could animate the bunny’s ear and eyes, The fox’s eyes, and the signs when you click on them.
I have also made some other sketches of my main character.

I also made a drawing where the bunny has it’s paw down, and one where it is standing:


HAHA! The one to the right looks weird!
This is a suggestion of how the background might look like .

I am also thinking about making similar sketches of the fox as well. I will do that another day.
I have decided to animate my characters with frame by frame animation after a little chat with the supervisor (olaug); She told me that the frame by fame technique gives a better result if you have good drawing skills.
